Latest Movie :
Recent Movies

Easily Unsubscribe From Unnecessary Mailing List (Gmail, Yahoo and AOL Mail)


Has your inbox flooded with daily deals, special offers, bulk mail and junk email messages and find it difficult to sort out urgent emails from other unimportant messages? The only solution is to unsubscribe from such mailing list and delete all such unnecessary messages from your inbox. Here is a quick and easy way to unsubscribe from all unnecessary mailing list and bulk senders.

Unsubscribr (free and paid) is an online service that helps you easily unsubscribe from all unnecessary mailing lists and delete all messages from that sender from your mailbox - no more hunting for tiny, hidden unsubscribe links on your messages.


Currently, the service supports Gmail, Google Apps, Yahoo! Mail and AOL Mail only. Once you give grant access to your mail account, it begins scan your email box for bulk and junk mail messages.


After finishing the scan, it lists each sender with an option to unsubscribe. You have two options for unsubscribing from a sender.

1. Just Unsubscribe: This option either send an unsubscribe email on your behalf or redirect you to an unsubscribe page.

2. Unsubscribe and Delete all: This option do the same as above, and also delete all messages from that sender from your mailbox.

Interested readers can visit Unsubscribr to get more details, how this service works, security about your account and pricing.

Another Method :


Unroll.me is a startup with a mission to declutter your inbox by consolidating mailing lists or newsletters you like into one daily digest, called a Rollup, and making it simple for you to unsubscribe from mailing lists you’d rather not be on. I used Unroll.me to unsubscribe from 63 unnecessary mailing lists and add 15 to my Rollup. (I left two daily must-reads out of my Rollup.)

Unroll.me also helpfully suggests mailing lists and newsletters you might like. You can add these to your daily Rollup or have them delivered individually. Users can also customize the delivery time of their Rollup to Morning, Afternoon or Evening.

After two days of using Unroll.me, I’ve spent far less time cleaning up my inbox than usual, and it’s nice to be able to unsubscribe from dozens of newsletters in one spot. You currently need an invite to join the Unroll.me private beta: to get one, sign up at Unroll.me or drop me a note with your email address (like all Unroll.me users, I have five invites to give away).

Restore Lost Capacity Of Your USB Flash Drive - How to


Yesterday i was transferring my data from my dell laptop to my friend sony vaio laptop. I had transferred all of my data to my laptop except of a 2 gb folder of my important data. I had connected my pen drive with my notebook, right clicked on the 2 gb folder, clicked on send to &  an error window prompt that my pen drive is full, i was like What !!!

Because, my pen drive was of 8 gb & was completely empty. Then i opened drives index & got surprised that the capacity of my 8 gb hp pen drive was reduced to 286 mb, then i formatted it 5 times but nothing happened, then i googled about this issue, there was an forum from where i got my solution, Active@ KillDisk a powerful and compact software that allows you to destroy all data on hard disks, USB drives and floppy disks completely, excluding any possibility of future recovery of deleted files and folders. It’s a hard drive and partition eraser utility, which uses low level format technique.

I downloaded it from its official website, it is a free utility with upgrade option to some more features, but free one was enough to save my money from buying new pen drive. I installed this utility & formatted my pen drive with this utility & magic ! the storage capacity of my usb pen drive was back to 8 gb.

Lesson i have learned from this  incident that, You Should unmount your  portable storage devices before removing it  from your laptop or pc

Download Active@ KillDisk

Access Your Facebook Account with 3 Passwords

Facebook uses this, to avoid login errors which are generally caused by keeping CAPS lock on while entering password. You can log in to your Facebook account by three passwords, one which is generated by you and another which are generated by Facebook itself, toggling the case of characters.
Let’s understand this with help of example.

Password 1 (User Generated)


Say you have password for your Facebook account as


Here the characters F,K,P are in upper case and all other characters are in lower case. This is your first and own generated password. You always use this. The remaining two passwords which are generated by Facebook are as Follows.

Password 2 (Altering cases)


The second password can be obtained by altering the case of characters. That means, you simply replace all upper case characters by lower and all lower case characters by upper. Put your password at Facebook login screen and hit enter. You will be logged in.


Here in above image you can clearly see that case is inverted. f,k,p of password is in lower case while the remaining characters are in upper case. Facebook creates this password to avoid login error which are caused due to leaving CAPS lock on while entering the password. So if your password is “myFacebooKPassword” then you can also use “MYfACEBOOkpASSWORD” for logging in.

Password 3 (For mobile only)


As lots of users use Facebook from mobile also, Facebook creates a special password for mobile device. For mobile device, Facebook do not consider case of first character. Whatever it may be, in lower case or in upper case, Facebook will log on you to your account.


Since many mobile phone automatically capitalizes the first character of the password. This may lead to log in errors. Here as shown in above image, even if your password is “myFacebooKPassword”, then you can use “MyFacebooKPassword” while logging in to your Facebook account.

You may try these variations with your own password on the Facebook login screen available at facebook.com. Except this three, non of the other variation can be used for logging in purpose.

According to Facebook:
We accept three forms of the user’s password to help overcome the most common reasons that authentic logins are rejected. In addition to the original password, we also accept the password if a user inadvertently has caps lock enabled or their mobile device automatically capitalizes the first character of the password.
Thus, if you have accidentally enabled CAPS Lock on the keyboard, the toggled password would still work on Facebook.

Surf Websites Anonymously & Acces Restricted Websites In Firefox


Several web sites are clogged in certain regional places, while others can not be used as web censorship is utilized to them, perhaps due to governmental factors. Also, web sites with articles that breaks trademark or other perceptive residence privileges are often clogged in some parts. This event can be quite aggravating for many customers, as they cannot accessibility a lot of articles online, but with AnonymoX, a Industry add-on, you can use of all such web sites by surfing around the web anonymously. With it, you can modify your IP deal with, place and check out web sites that are clogged or unavailable in your nation. You can modify the IP and place with only a few easy important without having to use proxy servers. All you need to do is either press the pink choice next to the look for bar or in the add-on bar, and press Change Personality to get a new IP Address. Also, remove treats by merely simply clicking the More choice.

If you don’t want to use AnonymoX on certain websites, simply click the blue button and select your website from the Settings for drop-down menu, and uncheck the Active option. You can also change the country and the service for individual websites. Click More to change settings for cookies and user agents.


AnonymoX Preferences allows you to enable/disable the Show in Add-on-bar, Show IP-Address and Show Country Flag options. Additionally, you can also Reset the notification settings.


This add-on can also be useful if you do not want internet sites to keep on top of and monitor your web surfing around conduct. Check out the hyperlink below to set up this add-on, and look a the web without any constraints.

Install AnonymoX  Add-On For Firefox

List of Facebook Shortcut Keys for Chrome, Firefox & IE

Shortcut keys can helps to do any certain work easily in Computer. Shortcut keys are vary from different manufacturers. Every one knows Facebook it is large social network site in World wide. If you are a Facebook user you can use some facebook features without help of your mouse through your keyboard shortcut keys. Facebook shortcut keys differents between browsers. Here the tables to explain facebook shortcut keys for major browsers Chrom, Firefox, IE


Facebook Shortcut Keys for Google Chrome


Keys Action
Alt + M New Message
Alt + ? Cursor in Search box
Alt + 0 Help Center
Alt + 1 Home Page
Alt + 2 Profile Page
Alt + 3 Friend Request
Alt + 4 Messages if any
Alt + 5 Notification
Alt + 6 Account Settings
Alt +7  Privacy Settings
Alt + 8 Official Facebook page
Alt + 9 Service Agreement 
L Like/Unlike Photos in Lightbox mode

If some shortcut keys does not work please update your browser using this link - Google Chrome


Facebook Shortcut Keys for Mozilla Firefox


Keys Action
Shift + Alt + M New Message
Shift + Alt + ? Cursor in Search box
Shift + Alt + 0 Help Center
Shift + Alt + 1 Home Page
Shift + Alt + 2 Profile Page
Shift + Alt + 3 Friend Request
Shift + Alt + 4 Messages if any
Shift + Alt + 5 Notification
Shift + Alt + 6 Account Settings
Shift + Alt +7  Privacy Settings
Shift + Alt + 8 Official Facebook page
Shift + Alt + 9 Service Agreement 
Shift + Alt + 6 Account Settings
L Like/Unlike Photos in Light box


If some shortcut keys does not work please update your browser using this link - Mozilla Firefox

Facebook Shortcut Keys for Internet Explorer 


Keys Action
Alt + M + Enter New Message
Alt + ? + Enter Cursor in Search box
Alt + 0 + Enter Help Center
Alt + 1 + Enter Home Page
Alt + 2 + Enter Profile Page
Alt + 3 + Enter Friend Request
Alt + 4 + Enter Messages if any
Alt + 5 + Enter Notification
Alt + 6 + Enter Account Settings
Alt +7 + Enter  Privacy Settings
Alt + 8 + Enter Official Facebook page
Alt + 9 + Enter Service Agreement 
L Like/Unlike Photos in Light box


* Some Shortcuts may not work in IE

20 Awesome Google Chrome Browser Tips and Tricks


Probably most of you are already using Chrome as your primary browser. If not, switch to it immediately. Chrome is extremely fast when compared to any other browser.
These tips will help you to get most out of the Chrome browser.

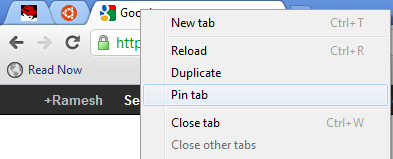
1. Pin Tab


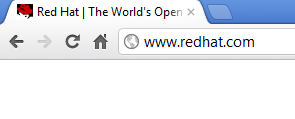
When you pin a tab, it minimizes the tab to display only the icon. When you have several tabs opened, this feature is very helpful, as the Tab title displays only the icon and takes only little real estate.

Before pinning:


After pinning 1st two tabs:


2. Display Home Button


By default, chrome doesn’t display the ‘Home’ button in the toolbar.
Click on the ‘Wrench Icon’ on the right-hand corner of the browser to get to the “Customize” option for Chrome browser -> Preferences (or Options) -> Select the check-box for “Show home button in toolbar”
This will now display the ‘Home’ button in front of the URL field. Click this button to go to your home page quickly.


3. Omnibox


The URL address bar (also called as Omnibox in Chrome) in the Chrome browser is not only to enter your URL. Just type the keyword you want to search and press enter, which will perform a google search.

You can also perform calculations or conversions directly in the Omnibox. Try typing any one of the following in the URL address bar and press enter to see the results yourself.

7 + 200
7 * 200
1 lb in kg
2 miles in km

4. incognito – Secret Mode


Incognito mode is for private browsing, where Chrome doesn’t record your browsing history, download hisotry. Any cookies that are stored during the incognito mode is deleted when you close the browser.

You can launch incognito by pressing Ctrl + Shift + N, (or) Settings -> New incognito Window, (or) right mouse-click on a link from a regular Chrome session, and select “open link in incognito window”.

One of the practical use for this mode (apart from private browsing) is to login to the same site using two accounts.

For example, if you have two gmail accounts, login using the first account in your regular Chrome browser, and login using the second account in your Incognito mode on your Chrome browser. This way, you can be logged in to two gmail accounts at the same time on Chrome browser.

5. Reopen Recently Closed tab


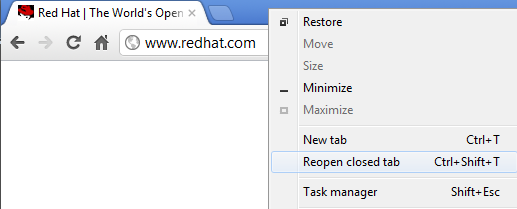
If you’ve closed a tab by mistake, you can open it by pressing Ctrl + Shift + T, (or) right mouse-click on the empty area in the title-bar -> and select “Reopen closed tab” as shown below.


6. Chrome:// commands


There are various about command that you can type in the address bar.
chrome://histograms chrome://memory chrome://cache chrome://dns etc.

7. Task Manager


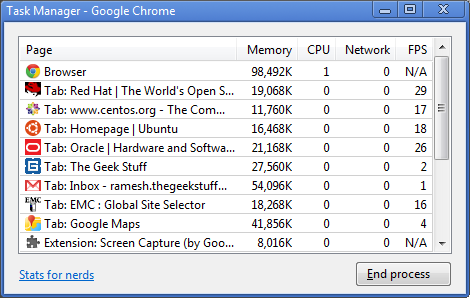
Task manager displays the memory and CPU usage of the Chrome browser, broken down by each and every Tab. If you have multiple Tabs open, and when your system is slow, you can use task manager to identify which Tab is causing the issue.

Right click on empty space in the title bar and select “Task manager”, (or) Press Shift + escape key to launch it as shown below.


8. Change Search Engine in the Omnibar


Type “amazon” in the address bar AND press “Tab”, which will change the address bar to “Search amazon.com:”, any keyword you type after this will be searched in the amazon.com and it will take you to amazon.com website.


You can also change the default search engine. Right click on the address bar -> and select “Edit search engine”. From here you can choose other search engines.

9. Open a link at a specific Tab Location


As you already know, when you right click on a link, and say “Open link in a new tab”, it opens it as a new tab (next to the current open tab).

However, if you want the link to be opened at a specific tab location, you can hold the link, drag it and drop it as a specific tab location. You’ll see a small arrow when you drag and drop the link. In the following example, I tried to drop the link at 2nd tab location.


10. Carry your Chrome Settings with You


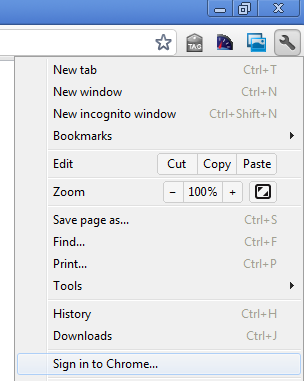
If you are using multiple computers (at home, at work, etc.), you don’t need to worry about trying to setup the Chrome browser in the same way on all the computers you use. Instead, setup your bookmarks, extensions, themes, settings, etc, on your Chrome browser on one computer, and select “Sign in to Chrome” from the settings menu as shown below.


This will ask you to enter your google username and password. This will save all your chrome settings on your google account. Next time when you sign-up from another machine, all your chrome settings will be visible on the new system. If you make any changes to your chrome settings on this new system, it will be available on your other computers too. Use this feature only on the systems which you trust and not on public computers.

11. Drag and Drop Downloaded file


Once a file is downloaded, you can just drag and drop the file (from the Chrome download window) to your Windows explore, or any other file browser that you are using on your system.

12. History


Press Ctrl-H, or go to Customize -> History, to launch the history window. From here you can search for a specific website from your history, delete all your history, or delete only selected items from your history.

13. Create a Shortcut of the Current Tab


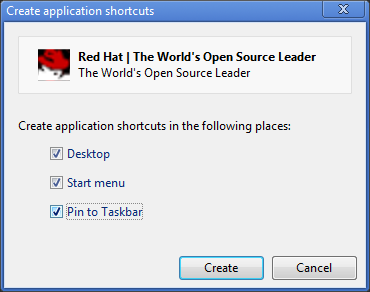
If you like to create a shortcut to the website that you are currently viewing, go to Customize -> Tools -> Create application shortcuts. This will ask you where you like to create the shortcut for this website, as shown below.


Once you create a application shortcut, next time when you click on it to open it, it will open this site in a Chrome browser without any tabs, url location bar, etc.

14. Navigate Between Tabs Quickly

  • Use Ctrl+Tab to navigate Tabs one by one
  • Press Ctrl-1 to go to 1st Tab
  • Press Ctrl-2 to go to 2nd Tab
  • Press Ctrl-9 to switch to the last Tab

15. Resize TextArea


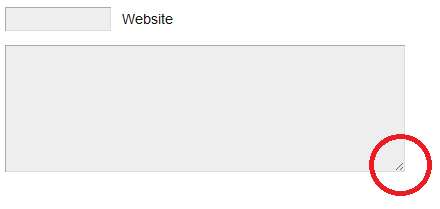
You can also resize a textarea that you see on any website. Please note that you can resize only the textarea and not a textbox. At the bottom right corner of the textarea, you’ll see two slanted lines, use your mouse, hold this, and drag it to resize the textarea on the screen.

You can try this yourself on the comment box (which is a textarea) located at the bottom of this page.


16. Detach a tab


If you have multiple Tabs opened, and like to detach a single tab as a separate Chrome instance, just drag the tab anywhere outside the browser, which will detach the tab and run it in a separate Chrome browser window.

17. Highlight a Text and Search


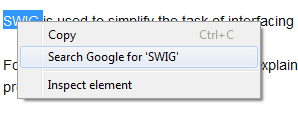
When you are browsing a website, if you come across some word that you are not familiar with and like to perform a google search on it, just double-click on the text to high-light it, right mouse-click, and select “Search google for”, which will open a new Tab and search for the selected text. This saves some time.


18. Autofill


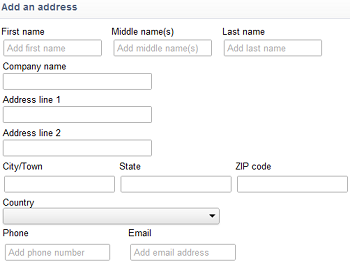
You can use the autofill option to enter one or more addresses that you can use to fill-up any web forms. You can also use this feature to store one or more credit card information that can be pre-populated on web forms. Don’t use this feature on a computer that you don’t trust.

Go to settings -> Options -> Personal Stuff -> Click on the check-box “Enable Autofill to fill out web forms in a single click” -> Click on Manager autofill settings -> Click on ‘Add new Address’ and enter the information.


19. Google Cloud Print


Go to Settings -> Options -> Under the Hood -> click on sign into “Google Cloud Print”.

Once you setup your printer using Google cloud print, you can print to it from anywhere. i.e You can print to it from your mobile, other PC at work, or any other system that is connected to the internet.

20. Google Chrome Browser Shortcuts


The following are some useful shortcuts:
  • Alt+F – Open the wrench menu (i.e chrome settings menu)
  • Ctrl+J – Go to downloads window
  • Ctrl+H – Go to history window
  • Ctrl+Tab – Navigate Tabs
  • Alt+Home – Go to home page
  • Ctrl+U – View source code of the current page
  • Ctrl+K – To search quickly in the address bar
  • Ctrl+L – Highlights the URL in the address bar (use this to copy/paste the URL quickly)
  • Ctrl+N – Open a new Chrome browser window
  • Ctrl+Shift+N – Open a new incognito window (for private browsing)
  • Ctrl+Shift+B – Toggle bookmark display
  • Ctrl+W – Close the current Tab
  • Alt+Left Arrow – Go to the previous page from your history
  • Alt+Right Arrow – Go to the next page from your history
  • Space bar – Scroll down the current web page
  • Shift+Control+del - which clears browsing data 
Source from : http://www.thegeekstuff.com/

Stop your Window when Unexpected Shutdown


Usually after shutting down windows we cannot re enter to windows , if we mistakenly shutdown windows , we have to wait long time to restart windows , now easy trick to pause windows while shutting down just enter winkey+r and after entering into windows goto run “shutdown -a” command  now you have stopped the shut down of windows and continue doing your works.

Press winkey+r

 After entering into windows goto run “shutdown -a” command  now you have stopped the shut down progress of windows and continue doing your works.
Powered by Blogger.
 
Support : Creating Website | Johny Template | Mas Template
Copyright © 2011. All Izzzz Well - All Rights Reserved
Template Created by Creating Website Published by Mas Template
Proudly powered by Blogger